Ampex 1455 Restoration
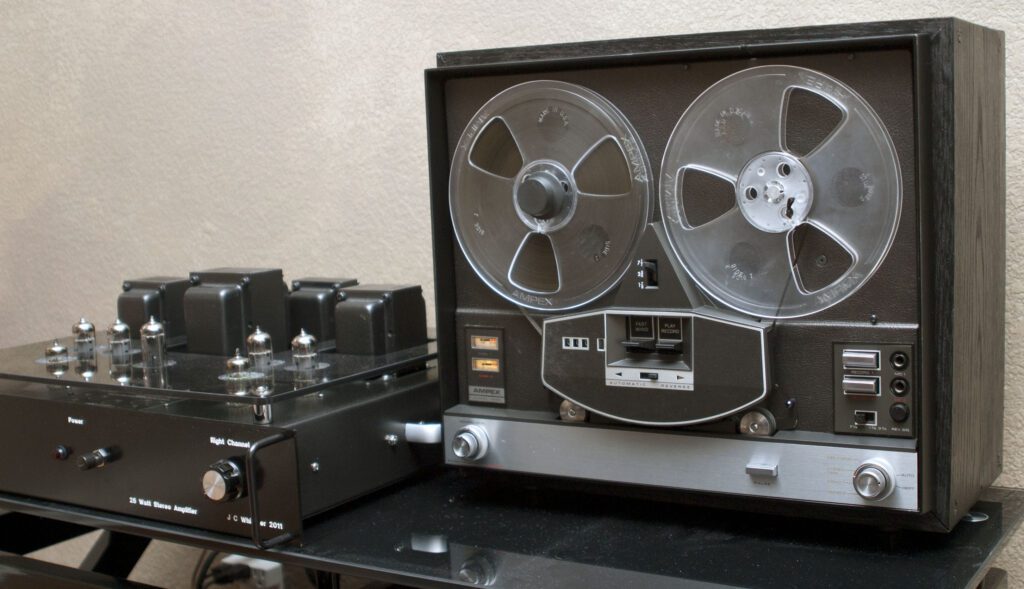
The Ampex 1455 audio recorder is a classic machine that was popular back in the late 1960s and early 70s. This restoration project takes a neglected and worn reel-to-reel recorder and restores it to like-new condition. The effort is documented below, from day one until completion.
The Ampex 1455 is a marvel of mechanical engineering. Like other reel-to-reel recorders of its day, mechanical complexity was traded for electrical simplicity. More expensive professional recorders used a number of solenoids, motors, and other electro-mechanical devices to move, stop, wind, and otherwise manage the tape. These devices were expensive, and so consumer products typically were electrically simple but mechanically complex. That is certainly the case for the 1455, as you will see in the following blog entries.
Back in 1969 I purchased an Ampex 1455 reel-to-reel machine for personal use. I loved it and used it extensively for making playlists from a variety of LPs. Decades later, when one of these machines came up for sale on eBay, I decided to buy it—and so the restoration project began.
Back in the day, a number of record labels offered albums on reel-to-reel tape (typically 7-inch reels) in addition to vinyl. The audio quality was generally good, although often less than a comparable vinyl disk when played on a high-quality system. Selling points included the potential for long playing times, particularly for “reversible” machines. The 1455 is a reversible machine. With this feature, rather than a linear 2-track (left and right) audio signal, four tracks are recorded on the 1/4-inch tape. When the reel of tape reaches the end, an inaudible tone puts the machine into “reverse” and plays the other pair of tracks.
Background – The eBay Purchase
After deciding to rebuild this model of vintage tape machine, I found some good candidates on eBay. Ordering a fixer-upper, I was disappointed when I got into the machine and tried to bring it back to life. The electronics was easy as the parts were generally available without too much effort (even the tape heads). The mechanical parts were quite another matter, however. The rubber components had deteriorated to the point that they were non-functional. Finding replacements for the mechanical parts seemed to be a considerable obstacle. So, the project went away.
After another, more recent visit to eBay, I found an Ampex 1455 in what appeared to be relatively good shape. This machine looked like it might be brought back to life.
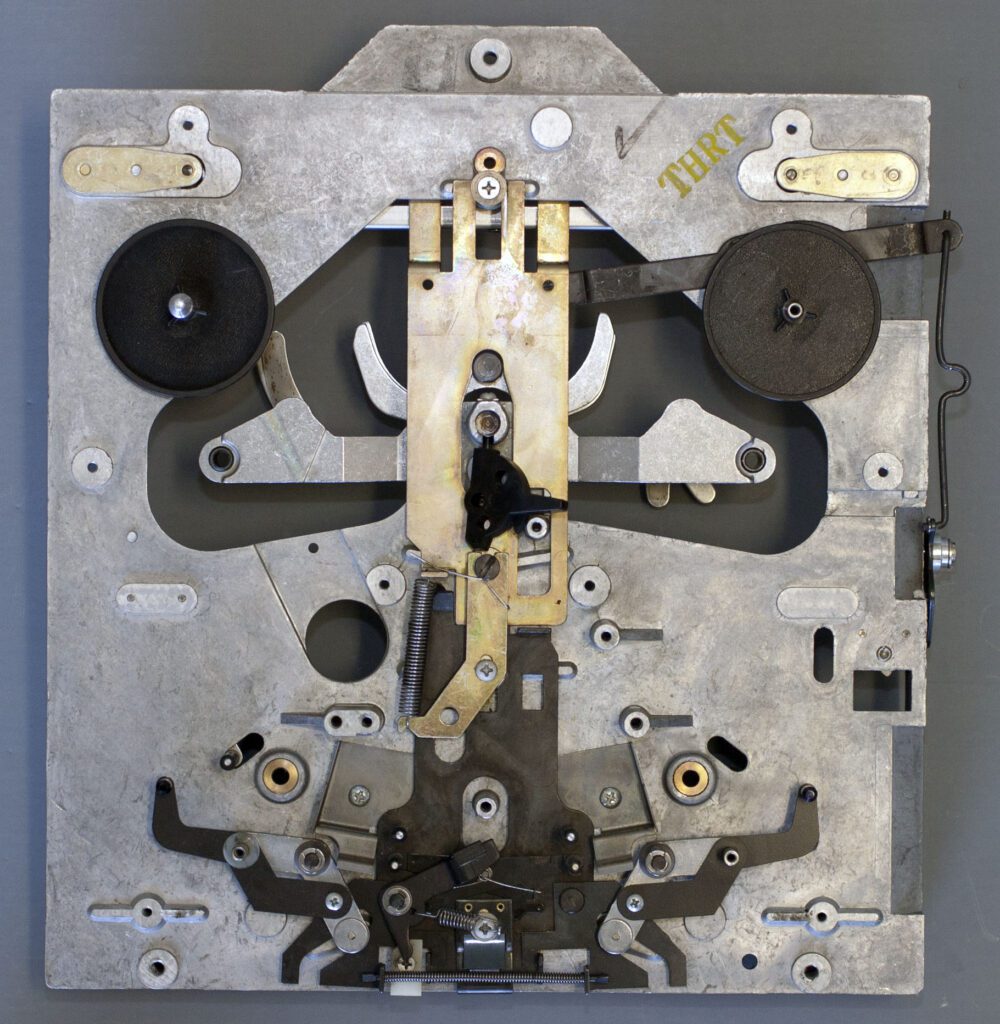
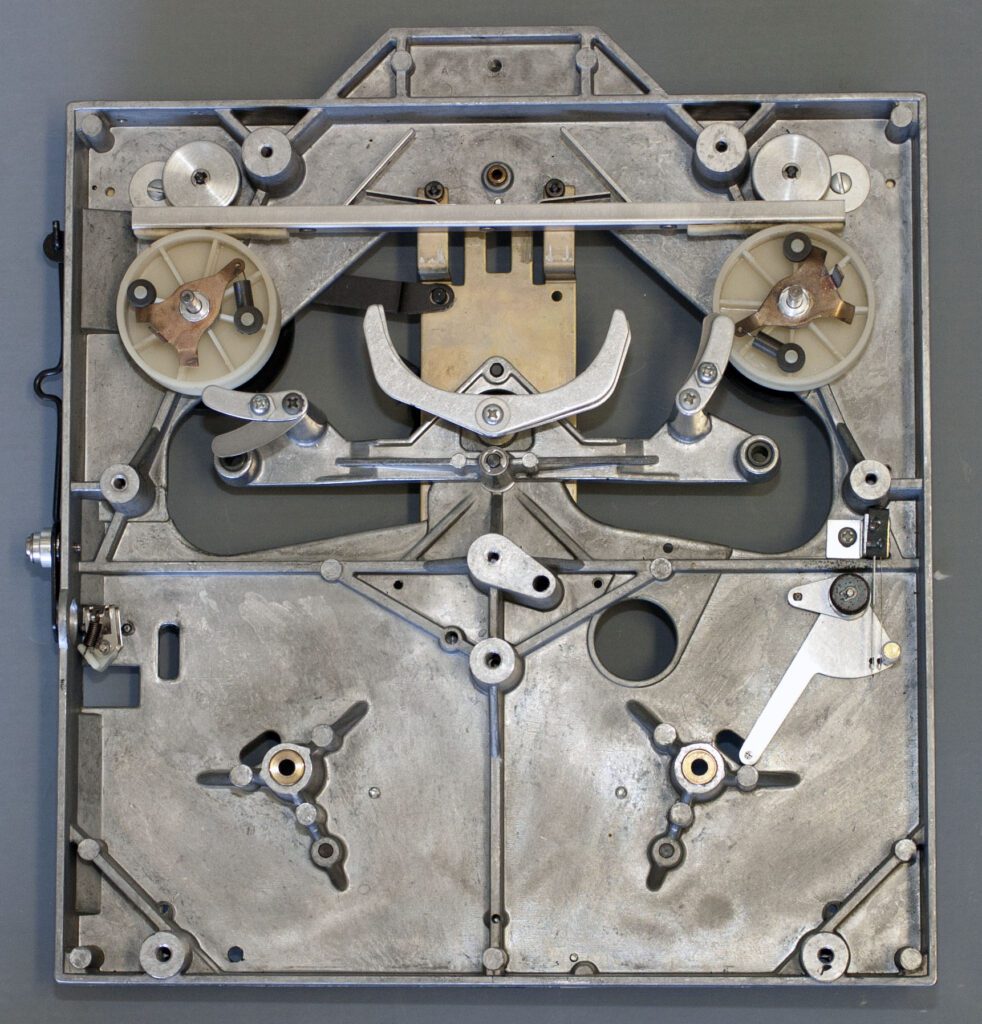
The Ampex 1455 transport is nicely designed, with a relatively small number of moving parts (for a reel-to-reel machine). A pair of belts connects the drive motor with the necessary pulleys and moving parts. Fortunately, replacement belts are still available on eBay, and perhaps elsewhere.
The major work expected for this restoration project will be to disassemble, clean, and lubricate (as necessary) the motor and mechanical elements. The chassis and front panel are in generally good shape, with no major flaws. The tape heads appear to be in good shape as well, with no obvious signs of wear.
This project is all about the mechanics of the machine. The internal electronics are transistor-based and appear to be in relatively good shape.
Day 1 – Determining the Scope of the Project
With about 10 hours into this restoration project, the scope of the work is now clear. As expected, the electronics are in good shape. The major mechanical work involves cleaning the moving parts. This machine apparently had been stored in a hot location for a very long time. The drive belts, which wind from the main motor through several idling pulleys and around the twin capstans, simply disintegrated. What was left of the belts decomposed into a gooey tar-like substance that is very difficult to clean up. The only practical way to clean the parts is to scrape off the excess junk with a putty knife and then strip off what is left with acetone. This work is decidedly unpleasant.
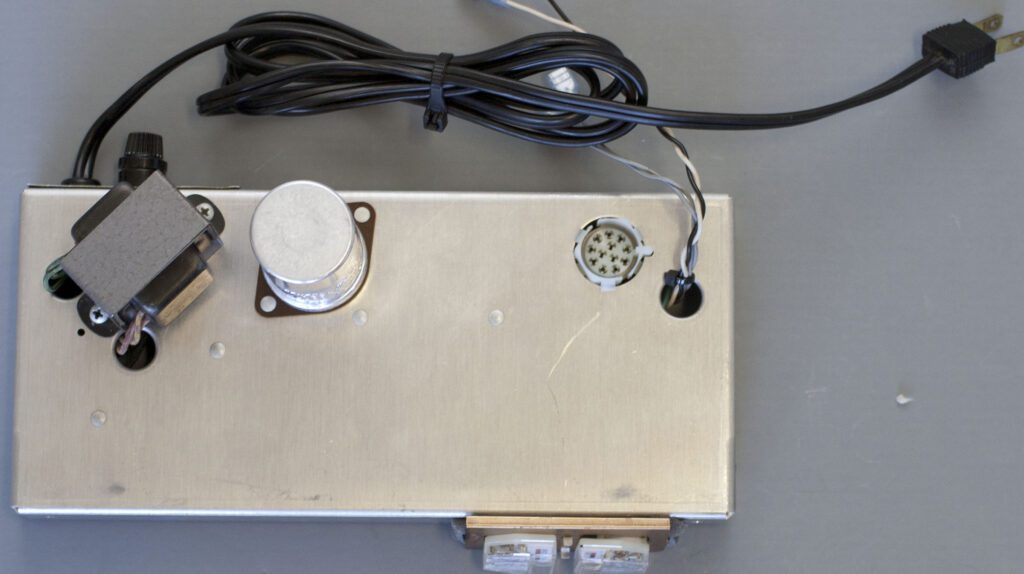
Fortunately, the recorder is modular in construction. The machine quickly divides into four main elements: the record/play electronics chassis and tape head assembly, the transport power supply, the transport electronics shelf, and the mechanical transport itself. Once the machine has been disassembled into these major elements, there is good access to the mechanical elements of the deck.
The prognosis for this machine is good. It is unfortunate that the belts disintegrated as they did. Still, it is (so far at least) an interesting project, with slow but steady progress being made.
After the initial post above, I received correspondence from a visitor to this page that sheds new light on the belt failure issue. With thanks to “C.D.,” the following additional information is provided.
The melting of drive belts was not an isolated issue. The original material was some high-tech composition that unfortunately did not stand the test of time. The chemical blend was not quite stable and eventually the belts would break down and revert into some elementary solids, and gas-out into certain vapors. Thus, the tar-like goo would result. Many of these wonderful machines to this day only need a good thorough cleaning and basic maintenance to perform as new. High temperatures do not really affect the melting of the belts, it’s just the effects of time.
A better alternative to acetone to clean the metal parts would be 91%+ rubbing alcohol. A reasonable compromise for tough spots might be Naptha. It evaporates more quickly, is slightly less toxic than acetone, and usually won’t hurt plastics. Acetone on any Ampex trim pieces will be bad news!
Day 2 – The Cleanup Begins
Work continues to clean up the drive belt remains from the various deck parts. It is a messy and slow task. While the end is in sight, it has been necessary to disassemble most parts of the deck. Fortunately, a detailed service manual is on hand, which should make the job of reassembling the machine much easier.
Viewed with some perspective now, I’m not sure I would do this again. Like most refurbishment projects, you don’t know what will be involved until you actually get into it. This one was more work that I had expected.
I had the opportunity to buy a different Ampex machine (same model number) from another person on eBay. The price was higher (about double what I paid for this one) but the seller said the machine worked. If it worked at all, then that means the drive belts were intact. As such, it would have eliminated the tedious cleaning work that I have been dealing with.
For those interested in doing a similar reel-to-reel project, you may want to consider only buying a machine that will run (i.e., the wheels will turn). The machine will likely cost more up-front, but it may save considerable headaches later in the process.
Day 3 – Cleanup Completed (thankfully)
The cleaning element of this project was (thankfully) finished today. Not much fun at all, but quite necessary to bring this classic machine back to life. In order to thoroughly clean the deck, it was necessary to do a major disassembly job.
In order to completely clean the deck it was necessary to remove nearly all components from the rear side. Most of the front-side components could be cleaned as needed without removal. Other than cleaning up the belt residue (which was a major task), this 40 year old machine was in rather good condition. Acetone worked well for cleaning the metal components. Be sure to use gloves, provide adequate ventilation, and carefully dispose of rags. (See the note above regarding alternatives to acetone.)
In addition to replacing the belts, which had disintegrated, it was also necessary to replace a rubber O-ring on two idler pulleys. Fortunately, a perfect replacement was found at a local hardware store.
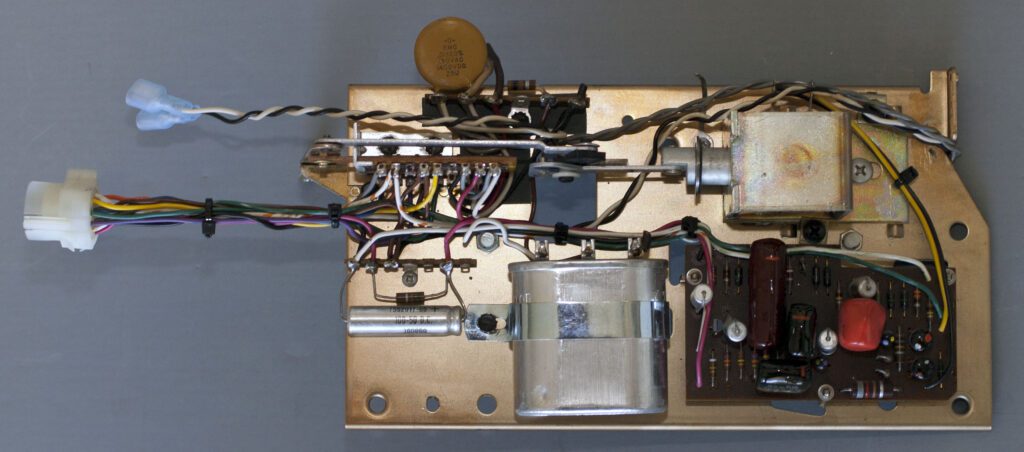
Shown above is the amplifier module, which neatly disconnects from the rest of the machine. The deck power supply module can be seen below. Internally, both electronics decks looked quite good, with no obvious signs of problems; e.g., leaky electrolytic capacitors.
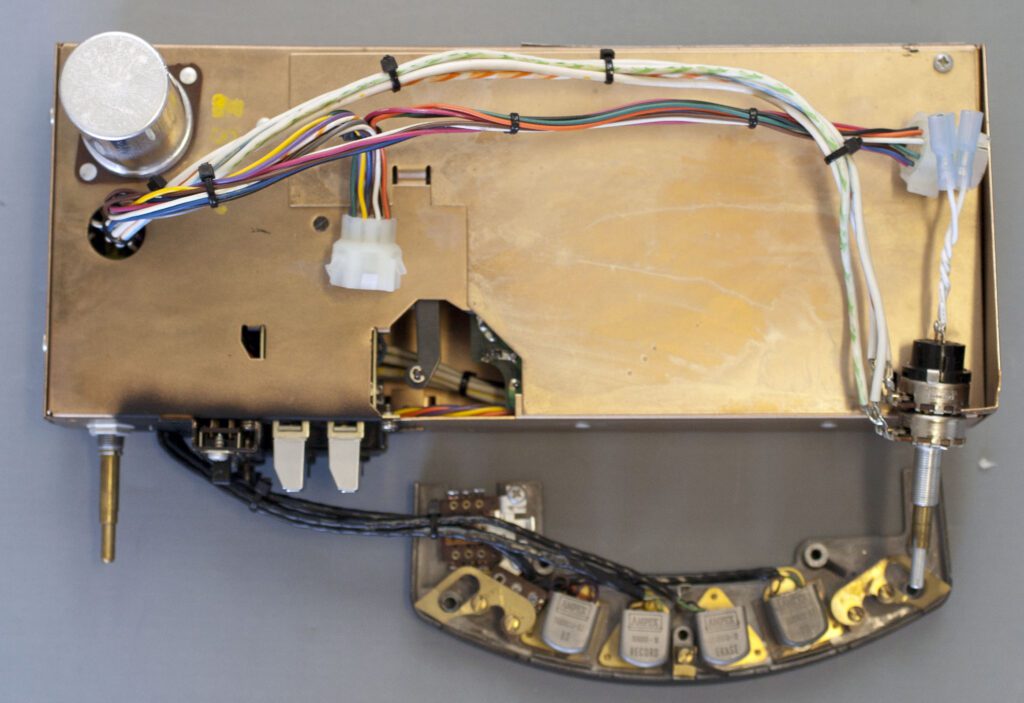
All controls were cleaned with a spray-on contact cleaner. The amplifier assembly is densely populated with components, but otherwise serviceable. Fortunately, the tape head shelf separates easily from the deck.
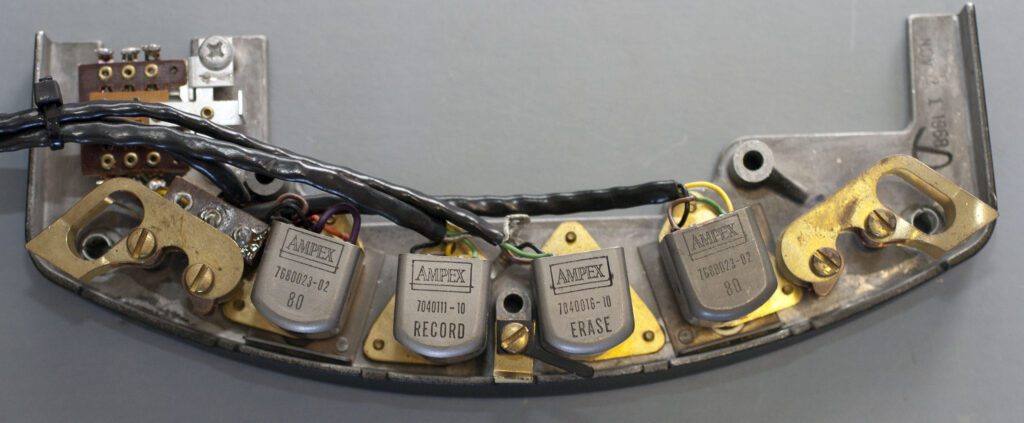
Shown above is the deck electronics shelf. A close-up of the tape head assembly can be seen below. The tape heads showed no obvious signs of wear. Replacement heads are available on eBay, and perhaps elsewhere. For insurance, I will probably pick up a spare set of heads. The four heads are (in order of forward tape motion): play reverse, erase, record, play forward.
The front side of the drive motor is shown below. There are four pulley positions on the shaft. The top (smallest) track drives the supply and take-up reel belt. The three lower tracks drive the capstan belt at 7-1/2, 3-3/4, or 1-7/8 IPS. No effort was made to disassemble and clean/lubricate the motor since it seemed to be in good mechanical shape.

The disassembly process was made easier thanks to the detailed service manual (the interaction of various mechanical components is not always intuitive). The service manual is nicely illustrated.
Day 4 – Reassembling the Machine
Good progress has been made on putting the deck back together. Having cleaned and lubricated the mechanical elements of the deck, the current task is to reassemble the machine. So far, so good.
With thanks again to C.D., some guidelines on lubricating the moving parts of the 1455 are in order. For low- and medium-speed bearings, 20W sewing machine oil is recommended (readily available from on-line retailers.) A good alternative is “3-In-One Electric Motor Oil.” For sliding surfaces, silicon grease (such as Sil-Glyde by AGS) works great. For the playback idler wheel shaft (the big white pulley that moves from rear-to-front engaging a smaller tire and driving the take-up reel) graphite can be used. Most oils and grease gum up and the shaft rarely oxidizes. Buff it with Scotch-brite pad, then apply graphite, and the pulley should glide back and forth easily.
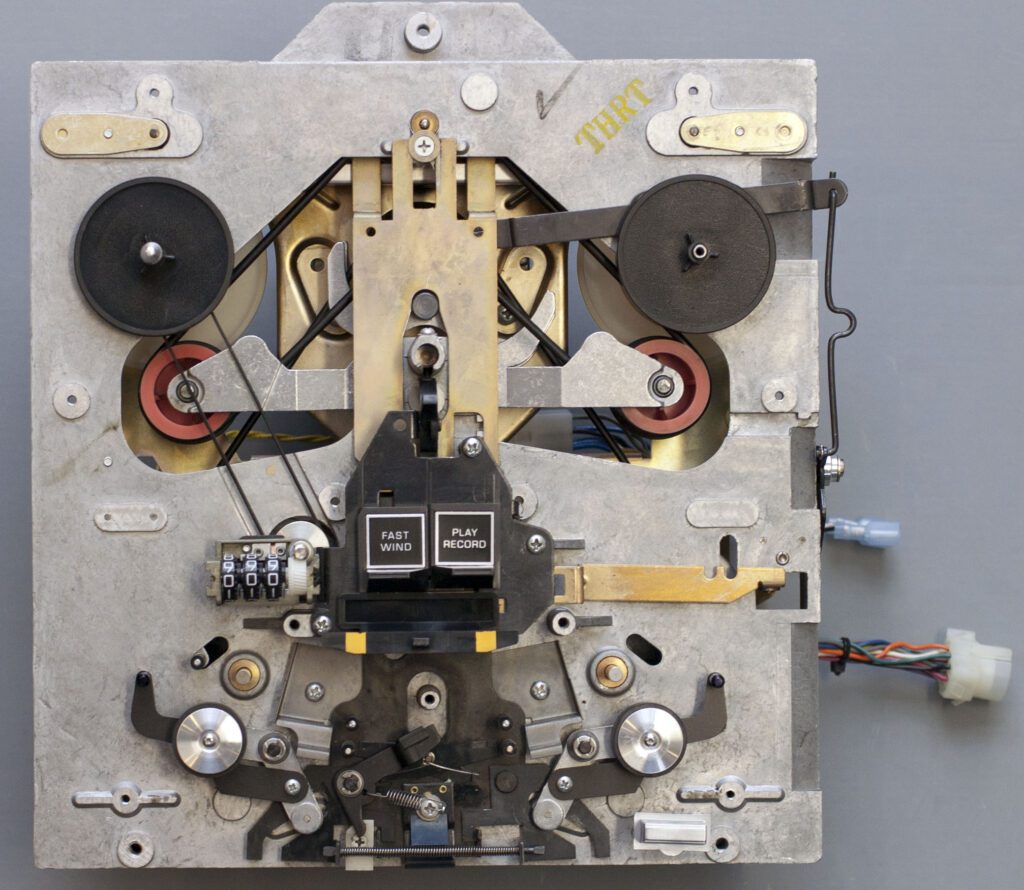
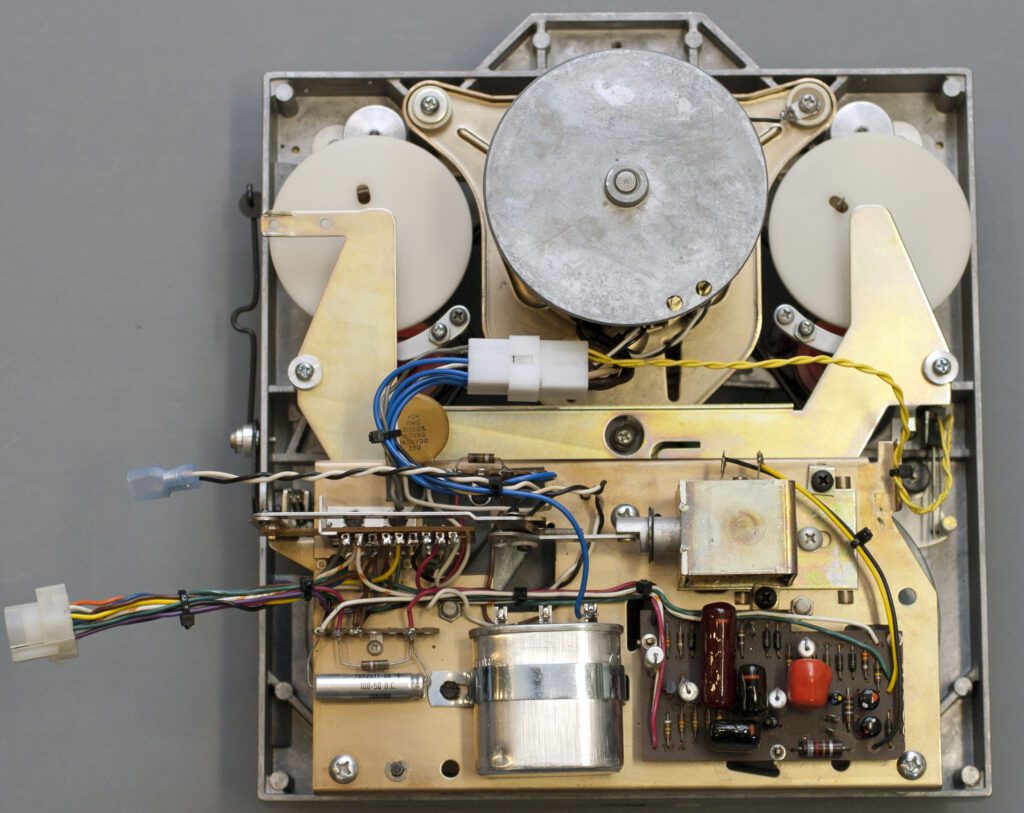
The reassembled deck front side is shown above, and the rear side is shown below.
Reinstalling the two drive belts was a bit of a challenge, as each winds through various components. The service manual was a great benefit here, since installation of the belts is not intuitive.
With any mechanical device such as this, the order of component installation is important. The reassembly process went well, with only a few detours to adjust for sequence errors on my part.
Day 5 – Final Assembly and Checkout
Final assembly went well, mounting the various sub-assemblies to the deck and reconnecting the cables.
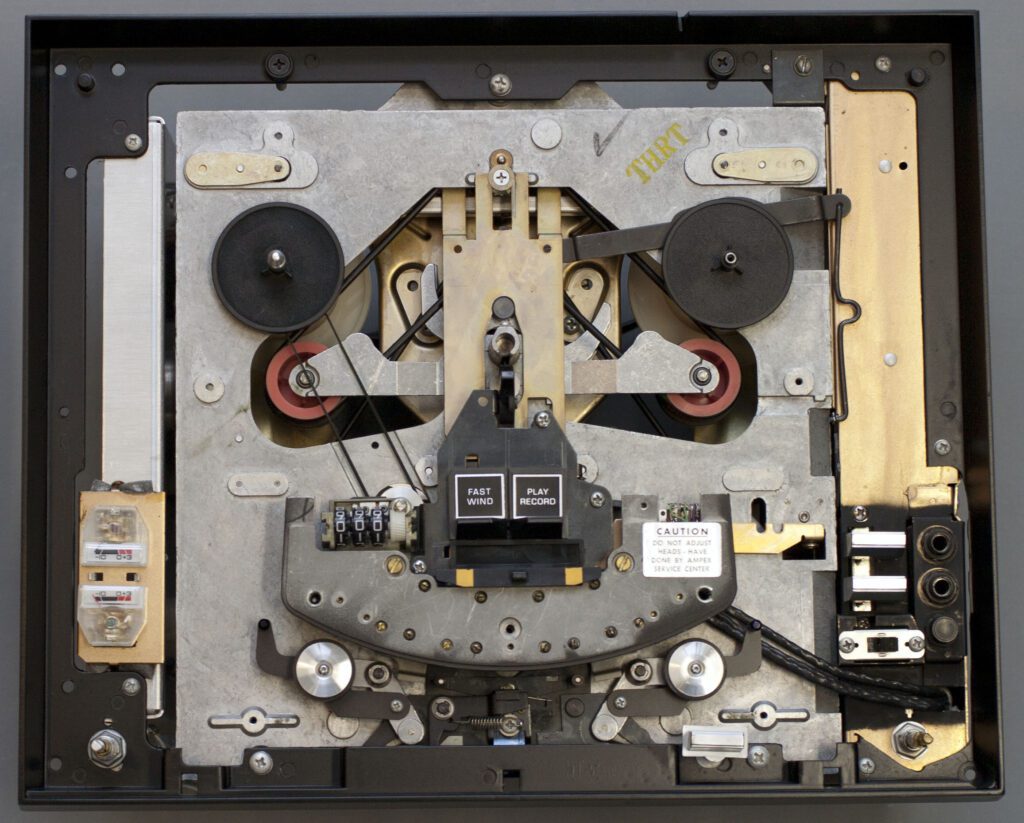
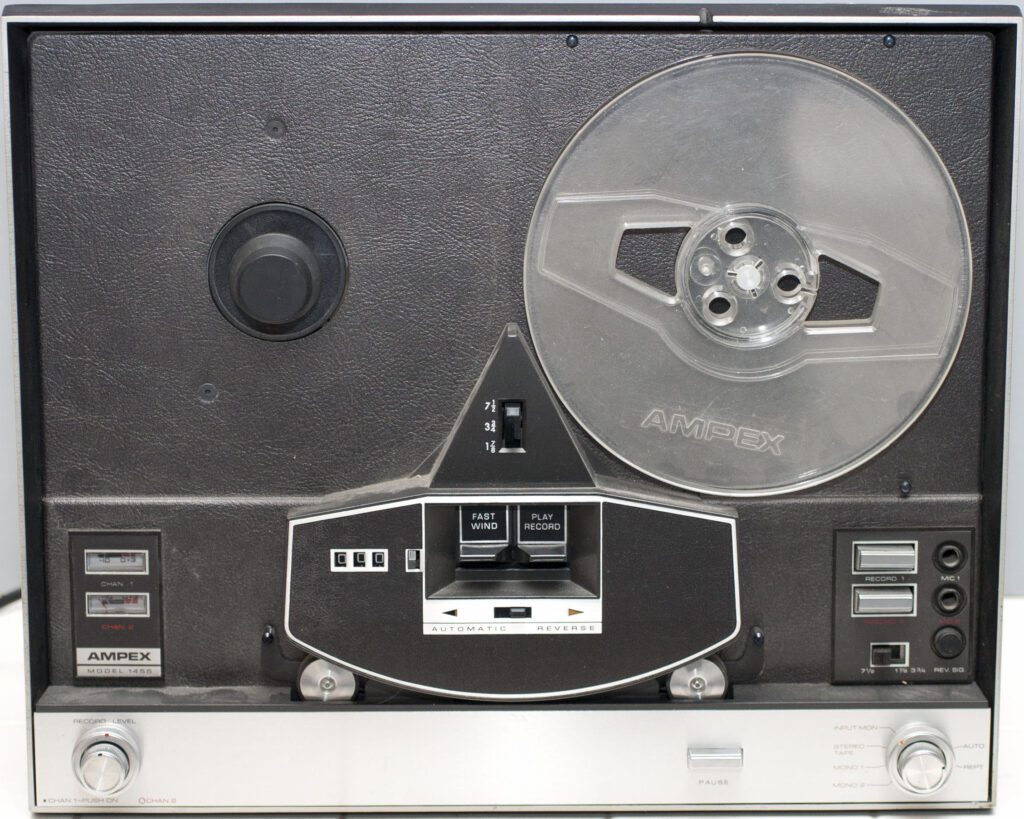
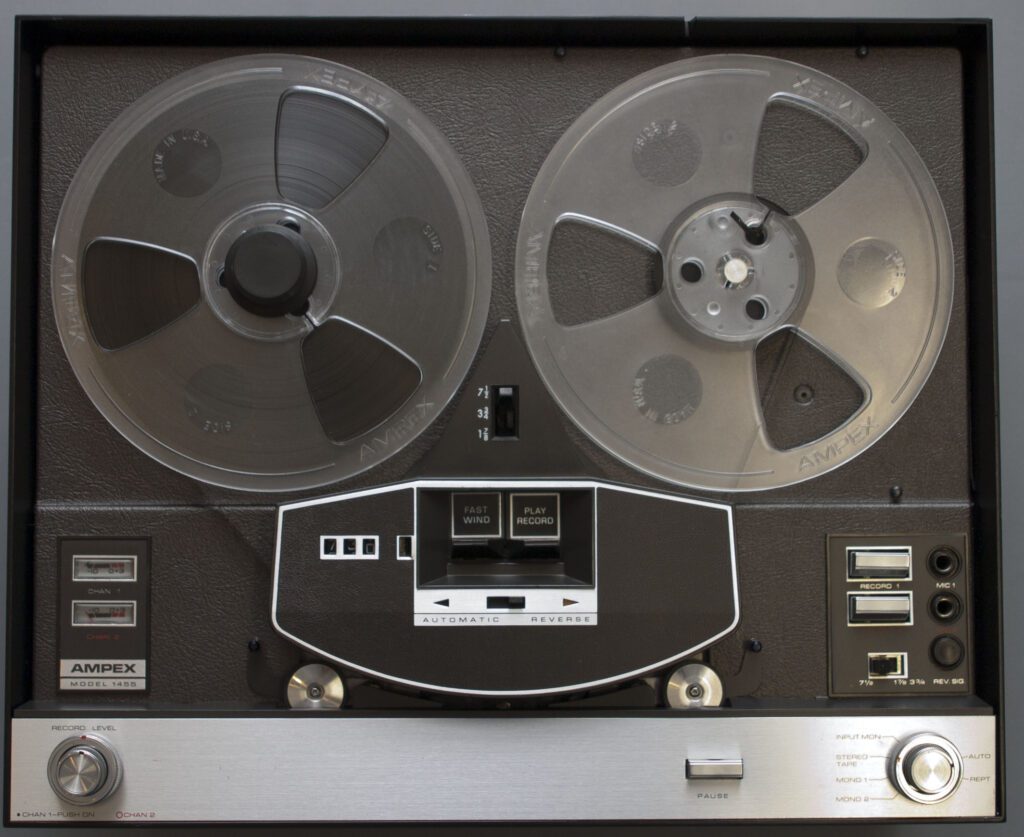
The front side of the recorder is shown above. All components have been mounted; all that remains is the deck cover plate and trim pieces. Here again, having the service manual on hand is a big help. Although the project started just a week ago, I had already forgotten how some of the pieces fit together.
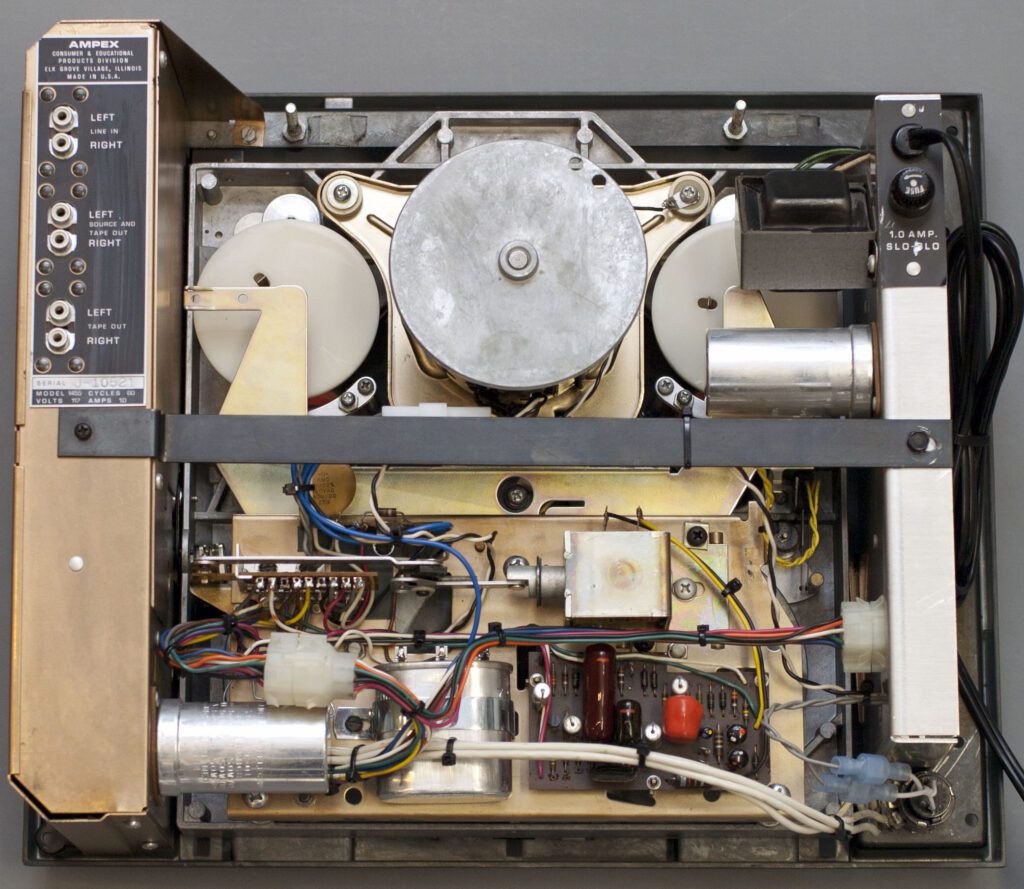
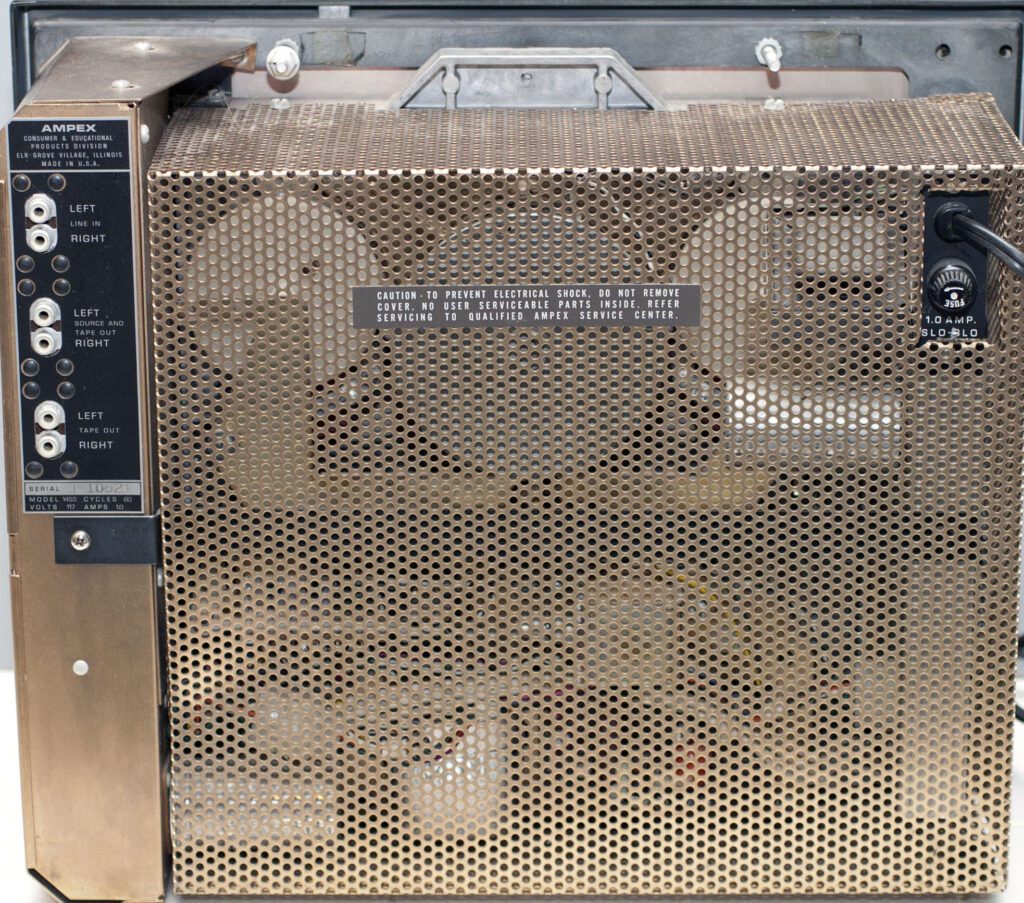
The rear side of the recorder is shown above. Note the record/play electronics module on the left side of the photo, and the deck power supply on the right side of the photo. The deck electronics shelf is shown in the lower middle part of the photo below the black horizontal support bar.
Day 6 – Success!
The machine is back together and it works. The first tests involved the tape-handling functions, which passed with flying colors. Then a record/play test was done—with excellent results. The machine records stereo and plays stereo. Quite impressive for a 40+ year old tape recorder that was dead on arrival.
Initial tests on the machine were limited to confirming functionality of the deck and record/play electronics. The deck handles the tape quite well, with no spillage when braking from fast wind or rewind. Music was recorded on the tape and played back with excellent results.
Still to come are tests on the electronics to confirm proper operation and then tape head alignment. All tests except head alignment can be accomplished with common audio test gear. Tape alignment requires a test tape, which may be difficult to locate.
In any event, for a first try at rebuilding an analog tape deck, this went quite well.
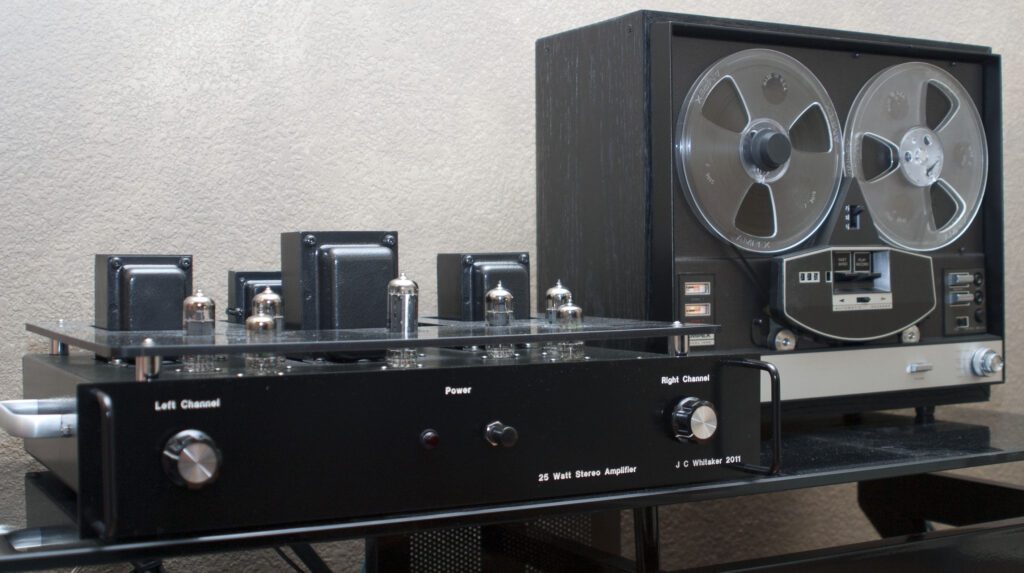
In addition to further tests, I need to construct a cabinet, presumably out of wood. A simple box will suffice that is just large enough to enclose the machine. I will probably finish it in a black stain to keep in the style of the vacuum tube audio gear that it will work with.
Day 7 – Alignment
Initial tests on the electronics have been completed, with good results. The machine is fully operational and meets specifications in all but one category (right channel frequency response). Owing to the lack of an alignment tape, no effort has yet been made to touch up the reproduce head alignment. The tape path permits real-time playback of recorded material, so frequency response measurements of the complete loop (record to play) is easily accomplished.
Overall frequency response on the left channel was within specifications, but response on the right channel was off spec by several dB at frequencies above about 10 kHz. Without an alignment tape it is difficult to determine whether this is a head problem or an equalization problem. Lowering the bias will increase the high-end response, but I am hesitant to do that until I have confirmed that the head alignment is correct. Of course, since the alignment of the left channel appears to be good, one would assume that the right channel would also be good, since they are physically within the same head.
For now, I will leave the heads and bias alone while I search for an alignment tape. If one cannot be found, I could order a pre-recorded tape and adjust the play heads for best “sound.” This is not a good solution, but may be better than not doing anything.
Day 8 – Frequency Response, Part 2
Returning to the frequency response issue, I ran another set of measurements on the recorder. The service manual describes the recommended steps for setting bias on each channel. After set for a particular voltage, frequency response tests can be run and the bias adjusted from the nominal value in order to optimize the high-end response. Lowering the bias increases the high frequency response.
Tests on the left channel indicated good performance (within specifications) with bias set for the recommended level. For the right channel, it was necessary to readjust the bias to bring frequency response within specifications. The service manual provides a minimum and maximum recommended operating point for bias on each channel. In order to bring the response on the right channel into specification, it was necessary to take the bias lower than recommended. The following compromise setting was established: 1) optimize the high-end frequency response through adjustment of the bias, and 2) readjust the bias upward in order to meet the minimum recommended level. This results in the right channel response being outside of the specification at 15 kHz, but only by a few dB.
I will use this setting until such a time a factory alignment tape can be found. As a practical matter, the machine sounds quite good and so there is no rush to address this issue. In addition to tape alignment, the heads also need to be demagnetized. The search is on for a head demagnetizer as well.
Looking at the heads on this machine, it is possible they are original. The leads to the heads are soldered on, and show no signs of being changed. In fact, the deck electronics shows no signs of maintenance either. If so, the performance of the heads—now several decades old—is quite remarkable.
Day 9 – The Cabinet
I completed building the cabinet today. Made out of 3/4-inch oak, it is a simple box, open at each end. The box is finished in black stain to match the deck itself and the other audio gear that the machine will be used with. The deck is made to mount either in a cabinet, or flush on another surface, such as a furniture piece of some type (e.g., console stereo). The deck is enclosed with a metal cage, so all the cabinet needs to do is hold the deck in place. The machine is designed to operate with the back open for ventilation.
Day 10 – Project Completed
Finished! This morning I mounted the recorder into the cabinet and connected it up to the stereo system in my office. The machine looks great and works quite well.
I found a head demagnetizer today and ordered it. The heads certainly need to be degaussed. However, since the machine already meets the target signal-to-noise performance, no major impact on performance is expected.
Regarding the alignment tape, it seems eBay will be the best source for that. The challenge is finding a head alignment tape for a 1/4-inch machine. One is certain to show up eventually.
Listening tests on the machine have been quite satisfying. A variety of music has been tried, all with good results. The high-end is little bright, which is expected since frequency response measurements showed a bit of a bump at 7.5 to 10 kHz—about 3 dB, which is within the original specs; the right channel falloff at 15 kHz is not noticeable in casual listening with available source material.
Without a test tape, I cannot easily measure wow and flutter. In listening, however, no speed variations can be detected.
Day 11 – The Test Tape
I managed to find a 1/4-inch full track Ampex test tape on eBay. It arrived today and I put it on the machine. The alignment was off slightly on the forward and reverse play heads. After adjustment, I am able to meet the new equipment specs of +/– 3 dB, 30 Hz to 15 kHz. Next, the record head was aligned. Following these adjustments, record/play frequency response measurements were run. The machine meets the +/– 3 dB target from 30 Hz to 13 kHz, and is down 4 dB at 15 kHz.
The machine sounds good and runs well.
Final Thoughts
I found a pre-recorded 1/4-inch tape (7-inch reel) on eBay and ordered it—Glen Campbell, “By The Time I Get to Phoenix.” I just put it on and it really sounds good. The tape was recorded at 3-3/4 ips, and the high end is very respectable. This album was recorded as a two-sided tape, and the Ampex 1455 has an auto-reverse feature. I was surprised to see that after the tape played to the end of “side 1,” it reversed and started playing “side-2.” Very cool.

In what was news to me, there are hundreds of reel-to-reel tapes for sale on eBay. I’m certain some are good, and others not so much. Having collected a few tapes so far, there is a degree of variability in quality, which is not surprising. The recorded levels differ somewhat, although not dramatically so. Unfortunately, the physical structure of magnetic tape can change over time, resulting in a loss of reproduced quality. However, the small sample of 1960s era tapes collected so far perform quite well.
I don’t see reel-to-reel displacing my growing collection of vinyl. Still, it is a fun option.
After using the machine for a few weeks on a dozen or so pre-recorded tapes, the utility of the auto-reverse feature has become clear. It is actually quite helpful. The reverse mechanism is activated by a 20 Hz tone on Channel 1 Side 1 of the tape. Some pre-recorded tapes have the auto reverse tone recorded at the end of side 1. Some do not. Fortunately, the 1455 has the ability to record the 20 Hz tone. In tests on a couple of pre-recorded tapes, this feature worked quite well.
I picked up another 1455 (again from eBay) that was functional when I received it, thus avoiding the disintegrated belt issue. It too was refurbished and placed into service.
At the end of a project, the builder usually asks himself or herself, “was it worth it.” The answer here is an emphatic “yes.”